Introduction
Replacing the battery in your mobile phone can seem like a daunting task, especially when you're dealing with components from a third-party supplier like PISEN. But the truth is, it's a straightforward process if you follow the right steps and have the right tools. Whether you're looking to extend the life of your device or replace a damaged battery, this guide will walk you through the process, from gathering tools to testing your new battery after installation.
Why You Might Need to Replace the Battery
If you’ve noticed your phone’s battery draining faster than usual or it’s not holding a charge as well as it used to, it may be time to replace it. Over time, batteries naturally degrade and lose their ability to store energy. Here’s why replacing it could be a smart decision:
Signs of a Dying Battery
Some of the signs that your mobile phone’s battery needs replacing include:
- Decreasing battery life: If your phone barely lasts through a few hours of use, it’s a clear sign the battery is worn out.
- Battery overheating: A phone that feels hot to the touch is another indicator that the battery isn’t functioning optimally.
- Sudden shutdowns: If your phone shuts off without warning, even when the battery shows a reasonable charge, it’s time for a new one.
Advantages of Replacing the Battery
Replacing your phone’s battery rather than upgrading to a new device can save you money. Plus, a fresh battery can breathe new life into your phone, improving its performance and extending its overall lifespan.
Essential Tools and Equipment
Before you dive into the replacement process, make sure you have the necessary tools. Here’s what you’ll need:
Screwdrivers and Prying Tools
You'll need precision screwdrivers to open your mobile device. A plastic prying tool can help you lift the back cover without damaging the device. Some kits include all the tools you’ll need, so make sure you have a complete set.
Replacement Battery
You’ll also need a compatible PISEN battery for your specific phone model. Ensure the battery is high quality and designed for your phone to avoid compatibility issues.
Preparation for Battery Replacement
Before starting, it’s important to prepare both yourself and your device. Here’s what to do:
Power Off the Mobile Device
Always turn off your phone before beginning any repair work. This ensures no electrical current is flowing while you’re working on it, reducing the risk of electrical shocks or short circuits.
Gather Your Tools and Set Up Your Workspace
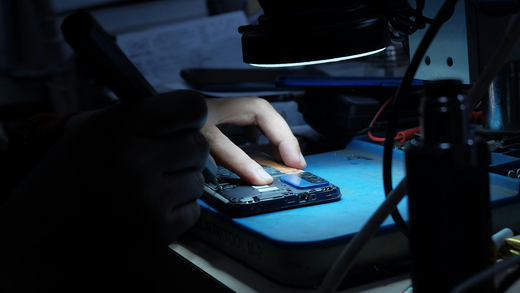
Make sure your workspace is well-lit, clean, and organized. Having everything you need within reach will help you work more efficiently and avoid losing small components like screws.
Step-by-Step Guide to Replacing the Battery
Now, let’s walk through the step-by-step process of replacing your mobile phone’s battery:
Step 1: Removing the Back Cover
Use your prying tool to gently lift the back cover of the phone. Be careful not to apply excessive force, as this could damage the phone. Some phones have adhesive under the cover, so it may require a bit more effort to remove.
Step 2: Unscrewing the Internal Components
Once the back cover is removed, you’ll likely see screws holding various internal components in place. Use the precision screwdriver to remove these screws, and set them aside in a safe place.
Step 3: Disconnecting the Old Battery
Locate the battery connector, typically secured with small screws or clips. Use your prying tool to gently disconnect the old battery. Be careful not to damage the connector or surrounding components.
Step 4: Inserting the New Battery
Place the new PISEN battery into the battery compartment. Make sure it’s properly aligned and connected to the phone’s power circuit. Ensure the battery is securely in place before moving to the next step.
Step 5: Reassembling the Mobile Device
Once the new battery is in place, it’s time to reassemble your phone. Carefully replace the internal components and reattach the screws you removed earlier. Then, replace the back cover, making sure it clicks into place securely.
Testing and Ensuring the New Battery Works
After replacing the battery, you’ll want to ensure everything is working as it should:
Turning On the Phone
Press and hold the power button to turn the phone on. If it powers up successfully, you’re on the right track!
Testing Battery Performance
Once your phone is on, check the battery level. If it shows charging properly and the percentage rises, the replacement was successful. It’s a good idea to let the phone charge fully and monitor for any irregularities.
Troubleshooting Common Issues
Sometimes, things don’t go as planned. If your phone isn’t working as expected after replacing the battery, don’t panic. Here are a few troubleshooting tips:
Phone Not Turning On After Replacement
If your phone doesn’t power on after replacing the battery, ensure the battery is properly connected. Double-check that the battery is aligned correctly, and make sure no components were left disconnected.
Battery Not Charging Properly
If the battery isn’t charging as expected, it could be due to a faulty charging port, poor battery connection, or even a defective battery. Try using a different charger to rule out the issue. If that doesn’t work, you might need to reconnect the battery or replace it again.
What If I Can't Replace the Battery Myself?
If you find the battery replacement process to be too challenging or you simply prefer professional help, don’t worry—there’s a solution. You can always visit an offline repair station for assistance.
Advantages of Choosing Professional Repair Services
Opting for professional repair services has its benefits. Here are a few reasons why you might want to choose an offline repair station over a DIY replacement:
- Expertise: Professionals have the experience and knowledge to handle the replacement quickly and efficiently.
- Warranty: Many repair shops offer warranties on parts and labor, giving you peace of mind that the work is guaranteed.
- Safety: If you’re unsure about the process, a professional can ensure the battery is installed correctly without causing damage to your device.
- Time-Saving: If you don’t have the time to carry out the replacement yourself, having a professional do it will save you hours of work.
- Quality Control: Repair shops often use high-quality tools and replacement parts, ensuring a better outcome than a DIY fix.
Conclusion
Replacing the battery in your mobile phone can seem intimidating, but with the right tools and a bit of patience, it’s something you can easily tackle yourself. By following the steps outlined in this guide, you can extend the life of your device and enjoy improved performance. If you encounter any issues during the process, don’t hesitate to consult a professional for assistance.
FAQs
-
How do I know if my PISEN battery is compatible with my phone model?
Always check the specifications of the battery and ensure it matches your phone model. PISEN usually provides compatibility information on the product page. -
Can I replace my phone’s battery without any prior experience?
Yes, as long as you follow a detailed guide and use the right tools, battery replacement is feasible even for beginners. Just take it slow! -
What should I do if the new battery doesn’t work?
Double-check that the battery is properly connected. If it still doesn’t work, it could be a faulty battery or an issue with the phone’s internal components. -
Is it safe to use third-party replacement parts?
Generally, yes. PISEN is known for producing reliable and safe parts, but always ensure you’re buying from a reputable seller. -
How long does it take to replace the battery?
Depending on your experience, the process typically takes between 30 minutes to an hour. Make sure you take your time and don’t rush through any steps.


Leave a comment
All comments are moderated before being published.
This site is protected by hCaptcha and the hCaptcha Privacy Policy and Terms of Service apply.